ผลต่างระหว่างรุ่นของ "CuneiForm"
| บรรทัดที่ 662: | บรรทัดที่ 662: | ||
==== Setting Up a Field Proxy ==== | ==== Setting Up a Field Proxy ==== | ||
{{code|link_proxy}} | There is quite a few (but repeated) steps in setting up a proxy element for a field. Hence, CuneiForm comes with a ready-to-use {{code|link_proxy}} function. | ||
'''{{code|lang=javascript|1= link_proxy(form_name, fname, proxy_ele, proxy_func)}}''' | |||
{| style="margin-left:20px;" | |||
|- style="vertical-align:top;" | |||
| style="width:120px;" | '''Parameters''' || | |||
* '''form_name''' ''(str)'': The '''id''' attribute of the {{code|form_obj}}. | |||
* '''fname''' ''(str)'': The field name to be bound to the proxy. | |||
* '''proxy_ele''' ''(HTML element)'': The proxy element. | |||
* '''proxy_func''' ''(JavaScript function)'': The function to run when the form is triggered (a usual routine on a [[Multi-component Page]]). This function should accept ''1 boolean argument and returns nothing''. | |||
|} | |||
This function takes care of the proxy linking and relaying some key events on it back to the real form field. | |||
=== Form Submission === | === Form Submission === | ||
{{The Tenko Shrine}} | {{The Tenko Shrine}} | ||
รุ่นแก้ไขเมื่อ 23:18, 15 เมษายน 2567
CuneiForm type objects are powered by WTForms engine. However, this object type also introduce a handful of additional variables and attributes to strike a sweet balance between ease of development and flexibility.
Define
Defining a CuneiForm is essentially similar to declaring a WTForm. There are no differences in declaring fields, validations, render keywords, and validating functions. (There exist a few special functions that can dynamically generate some common fields, but we'll leave that to a later section.)
Let's first have a quick look at a very basic CuneiForm:
class LoginForm(FlaskForm, CuneiForm):
    company = StringField("Company", validators=[InputRequired("Required!")])
    username = StringField("Username", validators=[InputRequired("Required!")])
    password = PasswordField("Password", validators=[InputRequired("Required!")])
    clear_session = BoolField("Log-out of other sessions", default=True)
    submit = SubmitField("Log-in")

    def validate_company(self, company):
        # Validation goes here
    def validate_username(self, username):
        # Validation goes here
    def validate_password(self, password):
        # Validation goes here
Developers might find uses of BoolField and IntField in CuneiFox code base unfamiliar. This convention is to avoid name conflict betweem WTForm and Peewee.
Special Value Types
This feature plays a crucial role in ensuring consistent value formatting for client-side output. While it originated as a solution to address browser formatting inconsistencies, it has evolved to serve several other purposes within the CuneiFox framework.
Original Intentions
Reading through the CuneiFox code base, one is sure to notice the excessive use of StringFields where one would expect DateFields, TimeFields, FloatFields, and IntegerFields as supported by WTForms. This design choice stems was made to address a challenging browser behaviour. Modern browsers tend to enforce formatting of fields marked as certain types based on the user's locale setting, which can be tied to either the operating system or the browser itself. This automatic formatting can be difficult to override or reverse, leading to inconsistencies and confusion on the user's part especially when switching workstations.
To address this issue, CuneiFox developed its own value typing. Our approach applies custom-made JavaScript codes on unformatted and untyped (as far as the browser is aware) fields. This way, the formatting rendered on the client-side perfectly obeys the company's specific preferences within the CuneiFox system.
Current Incarnation
Form value types are specified in the variable MASTER_sp_type residing within form definition code. The variable is of format:
MASTER_sptypes = [(str field_name0, str type0), (str field_name1, str type1), ...]

# Example from Accounting Journal's withholding tax form
MASTER_sptypes = [("taxdate", "date"), ("taxmonth", "month"),
                  ("rate", "pct"), ("amt", "acc"), ("tax", "acc"),
                  ("rate_2", "pct"), ("amt_2", "acc"), ("tax_2", "acc"),
                  ...]
# Example from Product information form
MASTER_sptypes = [...,
                  ("pict", ["img", "table", "product"])
                  ...]
Available Types
Special types valid within CuneiFox system are shown below:
- Date types
'date': Value with date, month, and year.'month': Value with only date and month.
- Time types
'time': Value with hour, minute, and second.
- Numeric types
'acc': Numerical value, rounded toaccdecimal places. (See Company Settings)'pct': Numerical value, rounded topctdecimal places, with "%" sign appended. (See Company Settings)'qty': Numerical value, rounded toqtydecimal places. (See Company Settings)'amt': Numerical value, rounded toamtdecimal places. (See Company Settings)'int': Numerical value, rounded to nearest integer.
- File types* (See note below)
'file': File field with CuneiFox custom action buttons.'img': File field with CuneiFox custom action buttons and an associatedimgHTML element.
- Other types
'right': Normal string field whose text is aligned right rather than the normal left.'color': String field with an associated color selector element.
NOTE THAT when using file types, the typeX value is a 3-membered list instead:
- Member 0: The type ('file' or 'img')
- Member 1: The source ('data', 'table', 'files', 'print', 'qr', 'report')
- Member 2: The sub-directory (string or None)
Instant Calculation
Instant calculation function within CuneiForms, or 'instacalc', allows a change in one form field to initiate a small calculation request to the server and update other affected fields based on the calculation result. It is specified in the variable MASTER_instacalc under form definition.
MASTER_instacalc = [(str trigger_fld0, [
                                           route0,
                                           [str collect_fld00, str collect_fld01, ...],
                                           [str result_fld00, str result_fld01, ...]]),
                                           ...
                                       ]),
                   [(str trigger_fld1, [
                                           route1,
                                           [str collect_fld10, str collect_fld11, ...],
                                           [str result_fld10, str result_fld11, ...]]),
                                           ...
                                       ]),
                    ...]

# Example from Accounting Journal's withholding tax form
MASTER_instacalc = [("amt", ["cunei_gl.calcwht", ["amt", "rate"], ["tax"]]),
                    ("rate", ["cunei_gl.calcwht", ["amt", "rate"], ["tax"]]),
                    ...]
- trigger_fldX is the field whose value change will trigger the instacalc routine.
- routeX can be either:
- A string similar to the string argument fed to Flask's
url_for. - A dict of format
{'route': str route_name, **kwargs}, wherekwargsrepresents arguments to be fed to the instacalc route.
- A string similar to the string argument fed to Flask's
- collect_fldXY are the fields whose values are collected and used in calculation routine.
- result_fldXY are the fields to be updated with the calculation result.
Auto-numbering Function
Forms with auto-numbering specifications work with CuneiFox core system to serve auto running numbers in a particular format (usually for document numbers).
The specifications for this feature are embedded within MASTER_autorun in this format:
MASTER_autorun = [(str run_field0, str sec_field0, str date_field0, str ref_field0),
                  (str run_field1, str sec_field1, str date_field1, str ref_field1),
                  ...]

# Example from Sale Invoice Form
MASTER_ autorun = [("docno", "section_stid", "docdate", None),
                   ("invno", "section_stid", "invdate", "docno")]
- run_fieldX is the field to trigger the auto-numbering function.
- sec_fieldX is the field holding the corresponding section static ID.
- date_fieldX is the field holding the corresponding date.
- ref_fieldX is the field holding the original value for WAIT function (Set to
Noneto disable WAIT support).
Other Form Definition Variables
Other notable MASTER variables that can be set upon form definition include:
MASTER_firstonly: A list of field names that are only active (editable) for a new entry, but inactive (not editable) when editing an old entry.MASTER_skipseqs: A list of field names to be skipped when the user is navigating through the form via Tab ↹ or ↵ Enter.MASTER_skipcols: A list of field names to be skipped when committing data to database. CuneiFox naturally skip fields that are meant for client-side viewing only (fields whose names are not present as database table columns). However, if the developer wants a field to be skipped despite the database having a similarly named column, do put the field name in this list.
These 3 variables share the same format:
MASTER_firstonly = [str field_name0, str field_name1, ...]

# Example from Accounting Journal's header form
MASTER_firstonly = ["docno", "section_stid", "section_code", "section_name"]
Initiate
Form initiation create an object instance for a CuneiForm. It should be noted that CuneiFox does not override the original __init__ of Flask_WTF's FlaskForm, but has written its own init_form class method which calls the original __init__ and performs other facilitating routines.
init_form(cl, prefix="", form_name="", gen_del=None, has_files=False, **kwargs)
| Parameters |
|
| Returns | A new FlaskForm-CuneiFox object. |
Submit-delete Field Set
The way CuneiFox handles data input and deletion requires fields named submit (SubmitField), del_submit (SubmitField), and is_del (BooleanField) to be present in most forms. So, CuneiFox allows developers to define a form with these 3 fields omitted, then provide a not-None gen_del argument upon initiation.
The way CuneiFox goes about this is to create a parallel FlaskForm-CuneiForm class with these 3 fields added, then store the new class in the module specified in the argument for repeated use. The gen_del argument can be:
str module_code: In this case, runtime class is stored within the module's 'forms' sub-module.[str module_code, str submodule_name]: In this case, the new class is stored in the specified sub-module.
NOTE THAT this feature does not override any similarly named field in the original form definition. For example, if the definition of the form already contains a 'submit' field, only 'del_submit' and 'is_del' fields are injected.
Notes on Keyword Arguments
The following sub-sections introduce notable keyword arguments. Other keywords not detailed here are also welcome during CuneiForm initiation. Unless explicitly specified, all keyword arguments can be accessed post-initiation as attributes of the created CuneiForm instance.
MASTER-adjacents
Back to the #Define section, we are introduced to a number of MASTER_xxx variables. Those variables set at form definition act as the default values for each form type. However, developers can feed an overriding value that applies only to the form being initiated using a corresponding non-master keyword (e.g. use keyword instacalc to override the class's MASTER_instacalc).
The option to modify object-specific values after initiation is also available. However, since value packing and manipulation occurs during initiation, some details should be noted:
- skipseqs, skipcols, firstonly, and autorun are normal form attributes and can easily be accessed and modified.
- instacalc are repacked as a dict upon initiation. The format and an example of post-init modification are shown below:
form.instacalc = {str trigger_fld0: [
                                       url_for_string route0,
                                       [str collect_fld00, str collect_fld01, ...],
                                       [str result_fld00, str result_fld01, ...]]),
                                       ...
                                    ]),
                  str trigger_fld1: [
                                       url_for_string route1,
                                       [str collect_fld10, str collect_fld11, ...],
                                       [str result_fld10, str result_fld11, ...]]),
                                       ...
                                    ]),
                  ...]

# Example from Product Return / Cancelled Order header form
head_form.instacalc["refdoc"]  = [
                                    url_for("cunei_iv.fetch_vouch_for_return", bookcode=bookcode),
                                    ["refdoc", "refdate", "docdate"],
                                    ["company_stid", "company_code", "company_name", ...]
                                 ]
head_form.instacalc["refdate"] = [
                                    url_for("cunei_iv.fetch_vouch_for_return", bookcode=bookcode),
                                    ["refdoc", "refdate", "docdate"],
                                    ["company_stid", "company_code", "company_name", ...]]
- sptypes is distributed and packed as field attributes. We will follow-up on the example given under #Special Value Types section. After initiation, special value specifications are thus set:
tax_form.taxdate.special_type = "date"
tax_form.taxmonth.special_type = "month"
tax_form.rate.special_type = "pct"
tax_form.amt.special_type = "acc"
tax_form.tax.special_type = "acc"
tax_form.rate_2.special_type = "pct"
tax_form.amt_2.special_type = "acc"
tax_form.tax_2.special_type = "acc"

# For file types, values are thus packed:
product_form.pict.special_type = "img"
product_form.pict.file_src_type = "table"
product_form.pict.file_src_dir = "product"
Know Thy Self
On the client-side, forms are going to be present, possibly, on a page along with other forms, tables, and modals. In many cases, they might even have to interact with them. So, CuneiForms need a way to identify themselves and other elements they are meant to work closely with. Below is the list of form attributes whose functions fall in this category:
- _id (str): The 'prefix' repacked. This value will become the HTML id of the form object. (Note that the attribute name is underscored to avoid conflict with python-native 'id'.)
- in_table (str: defaults to
Falsefor free-standing forms): The name of the table with this form as the in-line form. - table_linked (str): Similar to
in_tablebut this one applies to full pop-up form (as opposed to in-line form). - in_modal (str: defaults to
Falsefor free-standing forms): the ID of the modal with this form as the MAIN SUBMITTING COMPONENT. (See CuneiModal for details.) - sequence_bound (bool: defaults to
False): Whether form submission is linked to advance the edit-mode of the page. (See Multi-component Page) - slim (bool: defaults to
False): Whether to render the form in slim mode. (Normally, form label and field take 2 'rows' on the screen. In slim mode, form label and field share the same 'row', and the field is drawn with less vertical padding.) - subslim (bool: default is determined upon CuneiTable initiation): Similar to
slimbut applicable ONLY TO in-line fields of an in-line form. (E.g. fields in an expansion pop-up are not governed by this attribute.)
Sequence and Column Names
These few attributes govern the navigation, submission, and database-mapping of the form:
- seq ([str,]): Field names as defined via FlaskForm. Its order dictates the tab-sequence of the form on the client-side. If no value is given, the initiation routine automatically generates this list from FlaskForm.
- cnames ([str,]): Field names as matched with corresponding database model. If no value is given, the list copies from
seq. (See notes.) - submit_id (str: defaults to
'submit'):
The lists seq and cnames work together to create a mapping key. In other words, data entered through the form field seq[i] is written to database column cnames[i] and vice-versa for reading operations. DO NOTE THAT, under most use cases, seq and cnames both hold the same values. Assigning different values to seq and cnames is legitimate in some use cases. However, the rarity of such cases can make the code harder to parse by future developers. A more recommended way to achieve similar result is to explicitly assign values to appropriate columns/keys during data manipulation.
Getting Data
Under the normal work flow, CuneiFox sent only blank components to the client first to render the page. At this stage, a CuneiForm only displays either the default values (as specified during form definition) or the values fed explicitly before the template is sent. Once the page components are loaded, the elements (including CuneiForms) can then fetch data from the server, each using a separate HTML request.
These attributes below dictate the form's behaviours regarding data request:
- populate_route (url_for_string: defaults to
False): Route to which a data fetch request is to be sent. - populate_suppress ([str,]): The list of data fetch modes to suppress. (Refer to Note #1 for available fetch mode.) A most common reason to prevent any single CuneiForm to send a fetch request is so that a page-wide fetch request can be used in its stead. A page-wide request fetch the data for several components on the same page and populate them at once (See Multi-component Page).
- populate_id ([str,]: defaults to
False): The list of fields whose data are to be parts of a data fetch request. For example, if a fetch request needs to know theidof the fetch target, then the content of theidfield needs to be a part of the fetch request. Members of this list may take the formats listed below, and refer to Note #2 for additional information:<field_name>(like'id') refers to a field of the same CuneiFormmaster.<field_name>(like'master.id') refers to a field of the Master CuneiForm or CuneiTable. (Usually the header form of a Multi-component Page, see the article to learn how to declare a master.)window.<field_id>(like'window.pagenav') refers to a field with id'<field_id>'.- If
<field_id>contains a dash sign (-), the prefixwindow.can be safely omitted. This is to facilitate references to a field of another arbitrary CuneiForm which normally goes by id<form_id>-<field_name>
- If
NOTE #1: CuneiForm only has one fetch mode: 'grab'. However, the attribute populate_suppress takes a list format to mirror a similar attibutes in CuneiTable, which supports more fetch modes.
NOTE #2: On the client-side, CuneiFox automatically binds 'change' event on the listed elements to the re-fetch and re-populate actions. If such an event-binding is not desirable, prefix the member in populate_id with #. For example, '#id' and '#master.docdate'.
Sending Data
Normal submission behaviour of a FlaskForm is to send a POST request to the same currently displaying route, then the page is refreshed. This approach, although neat and clean, creates a choppy experience for users. The following attributes are CuneiFox's way to override this behaviour and submit a form without refreshing the page:
- post_route (url_for_string: defaults to
False): Route to send non-refreshing submit request. - redirect (bool:
Truewhenpost_routeis given,Falseotherwise): Whether the form submission will lead to a page refresh. This value is mainly for use in internal logic and hardly ever demands outside tampering.
Sometimes, a form submission is followed by a long, thread-based operation. More attributes are needed to dictate the thread-tracking behaviours.
- wait_long_process (bool: defaults to
False): Whether the form submission triggers a thread-based process (e.g. report prompt form). - track_route (url_for_string: defaults to
Falseifwait_long_processis not given, defaults to'/task_track'otherwise): Route to send task-tracking request. - wait_redirect (url_for_string: defaults to
False): Route to redirect to when the long-process associated with the form is completed.
Design & Pre-made Scripts
Now that a CuneiForm is defined, initiated, and sent along with a template, it comes to the frontend part. To put a form up on an HTML page, CuneiFox's standard pattern comes in 3 steps:
- Initiate a
<form>DOM element and a JavaScript form object. Both are done via the Jinja2 macrogeneral_form_head. - Place form fields at will (preferably with Jinja2 macros included in
cunei_forms.htmlpack). - Finalize the Javascript object and bind relevant events with the Jinja2 macro
general_form_tail.
NOTE THAT, in this section, unless explicitly specified:
formrefers to a CuneiForm instance sent from Flask and accissible by Jinja2form_domrefers to the<form>DOM elementform_objrefers to the JavaScript form object.
General Form Head & Form Object
general_form_head(form, is_master=false, multipart=false)
In essence, this Jinja2 script is responsible for the following actions:
- Create a
<form>DOM element corresponding to the form. - Register the form to the
all_tbfm_idslist for future reference. - Create a
form_objcorresponding to the form, and assign default values to its many attributes. - Point the variable
master_tbfmtoward the newly createdform_obj(if applicable). - Point the main component object attribute of the modal object referenced by form.in_modal (
modal_obj.main_comp_obj) toward the newly createdform_obj(if applicable).
Below is the list of and notes on form object attributes:
- Basic Attributes
- _id: Takes on the value of
form._id. - self_type: Takes on value
'form'. - token: The CSRF Token of the form, used to verify the form submission request.
- _id: Takes on the value of
- Copied Attributes (See #Notes on Keyword Arguments for details)
- skipseqs, firstonly, in_table, table_linked, sequence_bound, slim, subslim, seq, populate_route, redirect, wait_long_process, track_route, and wait_redirect: Takes on the exact value.
- instacalc and populate_suppress: Takes on the exact value, but set to a blank dict
{}and a blank array[], respectively, when the value isFalse. - submit_id: Takes on the exact value if the corresponding submit button does not require a confirm pop-up. If a confirm pop-up is needed, the value is suffixed with
_fake, e.g.'submit_fake'. (See #Buttons & Submits for more details.) - cnames: Takes on the exact value. However, members of which corresponding fields are not drawn are changed to
null. - populate_id: Takes on the exact value, with all prefix
#cut once event-binding is taken care of. - in_modal: Points to the corresponding modal object.
- post_route: The original value is stored in the attribute orig_post_route. This attribute itself is modified with data when a submit request is being prepared.
- References to DOM Elements & Objects (Arrays marked with * shares the same length as
form_obj.seq, with undefined elements padded withnull.)- form_ele: Points to the corresponding
<form>DOM element. - fill_eles*: An array collection of the field elements themselves. You might access this array to manipulate the value or status of a field.
- fill_ele_divs*: An array collection of the fields' ultimate parent
<div>elements. You might access this array to manage the visibility of a field (along with its adjacent label, buttons, status messages, etc.) - fill_ele_labels*: An array collection of the fields' label elements. Accessing this array is rarely required manually.
- fill_ele_errmoms*: An array collection of the fields' non-label elements. Accessing this array is rarely required manually.
- fill_ele_imgboxes*: An array collection of the fields' corresponding
<img>elements. (See note under #File & Image Fields.) - submit_ele: The submit element (most likely a
<btn>) of the form. - proxy_submit_ele: The mock element meant to be used instead of the form's own submit element. Use cases include the need to call additional functions before form submission and form chaining.
- linked_modals: An array collection of 'modal objects' linked to the form via search-and-fill relationships.
- form_ele: Points to the corresponding
- Field State & Type Attributes
- readonly: An array collection of the names of fields to be rendered with
readOnly = true. This array is used during form triggering to preserve the desired field states. - disabled: An array collection of the names of fields to be rendered with
disabled = true. This array is used during form triggering to preserve the desired field states. - spfield_idx: An array collection of indices of fields with special value types.
- readonly: An array collection of the names of fields to be rendered with
- Custom Sequences (If not
null, each member of both arrays takes the format[str form_id, int ele_seq_idx]. Use cases for both arrays include form chaining.)- custom_next_ele: An array collection of custom forward tab-sequence. If
form_obj.custom_next_ele[i]is defined, pressing Tab ↹ onform_obj.seq[i]will take you to the field referenced inform_obj.custom_next_ele[i]instead ofform_obj.seq[i+1]. - custom_prev_ele: An array collection of custom reverse tab-sequence. If
form_obj.custom_prev_ele[i]is defined, pressing ⇧ Shift+Tab ↹ onform_obj.seq[i]will take you to the field referenced inform_obj.custom_prev_ele[i]instead ofform_obj.seq[i-1].
- custom_next_ele: An array collection of custom forward tab-sequence. If
- Status Attributes
- in_table_row (int): The row index of the entry currently working on by the in-line form.
- triggered: Whether the form is in the triggered (fill-able and submit-able) state.
- populating: Whether the form is currently in a populating cycle. This state attribute prevents other populating-based routines to run in conflict and prevents the submission of an incompletely populated form. Only reset this flag via setter routine
form_obj.populating_tag_reset. - search_filling: Whether the form is currently in a search-fill cycle. Search-filling counts as a populating-based routine. This flag prevents conflicting cycles and submission of incompletely populated form. Only reset this flag via setter routine
form_obj.search_filling_tag_reset. - proceeding: Whether the form is trying to proceed in its tab sequence. This flag might seem trivial, but since the key press Tab ↹ and ↵ Enter trigger both search-filling and proceeding, it is crucial to correctly handle element in focus. Only reset this flag via setter routine
form_obj.proceeding_tag_reset. - waiting_instacalc: An array (queue) for intracalc cycles being stopped from running by another cycle in process (e.g. by populating flag).
- skip_instacalc: A temporary lock put on the form's instacalc cycle. When this flag is
true, instacalc cycles will be be triggered by change events on fields. This flag is a normal part of in-line form populating cycle. - submit_as_del: Whether the form will be submit in delete mode. This flag is flipped to
trueonly when the real delete button (the one in the confirm modal) is clicked, and is reset immediately when a submission cycle ends. Handle this flag exclusively through setter routineform_obj.set_submit_as_del. - pass_timechk: Whether the form has passed a time-check test. Prior to each submission request, the form must send a small time-check request. If the server found that the form is working under the wrong month, a 461 error is raised and the submission is halted.
- waiting_to_submit: Whether the form has a submit action in queue. This flag is flipped to
truewhen a submit routine is interrupted by other flags or by the need to make a time-check request beforehand. It is reset automatically as a part of the submission cycle. - pass_finalchk (Only applies to form with 'redirecting' submit): Whether the form has passed final check and a submission request is underway. This flag prevents redundant submit requests.
- submitting (Only applies to form with 'non-redirecting' submit): Whether a submission request is underway. This flag prevents redundant submit requests.
- Data Attributes
- current_data_raw: Raw data (prior to being formatted for human-readability) in JavaScript object format.
- transient_data: Temporary data (in JavaScript object format) meant to be used by commands in post_submit_cmds and post_insta_cmds. The data is sent from the server under key
'_transient_data'upon each data fetch or instacalc request. The variable is reset tonullat the end of each submission and instacalc cycle.
- Additional Functions & Routines
- post_load_cmds ([function,] or
false): An array of functions to run at the end of a form-populating cycle. - post_insta_cmds ([function,] or
false): An array of functions to run at the end of an instacalc cycle. - post_submit_cmds ([function,] or
false: Only applies to forms with 'non-redirecting' submit): An array of functions to run at the end of a submission cycle. - field_change_routines: An object that organizes functions to run on change events of different fields.
- post_load_cmds ([function,] or
CuneiForm Jinja2 Macro Pack
When putting form fields onto the client-side pages, there is absolutely nothing stopping developers from using the ordinary WTForms+Jinja2 approach. However, with the amount of forms and fields CuneiFox will be handling, the code can get unwieldy fast. So, at the cost of some flexibility, CuneiFox comes with a macro series to automate the most common field formats, along with the accompanying scripts and events. Let us take a little tour on these macros.
Due to the number of arguments in these macros, for the sake of all things holy, DO NOT rely on argument order farther than form and blank, ALWAYS PROVIDE argument keywords.
String & Text Area Fields
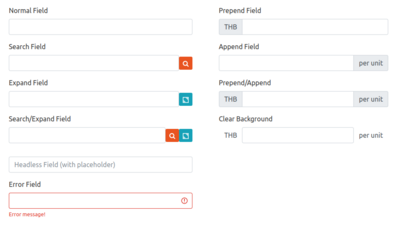
String and text-area fields are the most prevalent type of form fields, and also one most riddled with features and expectations. The CuneiFox macro that handles rendering of these fields is render_blank.
render_blank(form, blank, track_tb=false,
             search=false, fill=false, expand=false,
             field_modal=false, field_tab=false,
             prepend=false, clear_prepend=false,
             append=false, clear_append=false,
             label_width="105px", headless=false,
             hidden=false, tabindex=false,
             pad_bottom="default",
             force_fat=false, force_slim=false, slim_pb=2)
Drop-list Fields
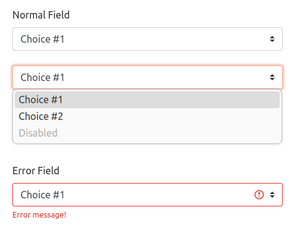
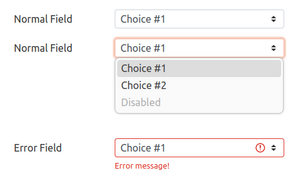
render_select(form, blank,
              field_modal=false, field_tab=false,
              label_width="105px", headless=false,
              hidden=false, tabindex=false,
              pad_bottom="default",
              force_fat=false, force_slim=false, slim_pb=2)
| Parameters | (See descriptions under #String & Text Area Fields sub-section) |
Checkboxes & Toggles
render_check(form, blank,
             field_modal=false, field_tab=false,
             hidden=false, tabindex=false,
             disabled=false)

render_toggle(form, blank,
              field_modal=false, field_tab=false,
              hidden=false, tabindex=false,
              disabled=false, pad_bottom="default",
              force_fat=false, force_slim=false)
| Parameters | (See descriptions under #String & Text Area Fields sub-section)
|
Radios
render_radio(form, blank,
             field_modal=false, field_tab=false,
             label_width="105px", headless=false, col=1,
             hidden=false, tabindex=false,
             force_fat=false, force_slim=false,
             disabled=false)
| Parameters | (See descriptions under #String & Text Area Fields sub-section)
|
File & Image Fields
render_upload(form, blank,
              field_modal=false, field_tab=false,
              label_width="105px", headless=false,
              hidden=false, tabindex=false,
              pad_bottom="default",
              force_fat=false, force_slim=false, slim_pb=2)
| Parameters | (See descriptions under #String & Text Area Fields sub-section) |
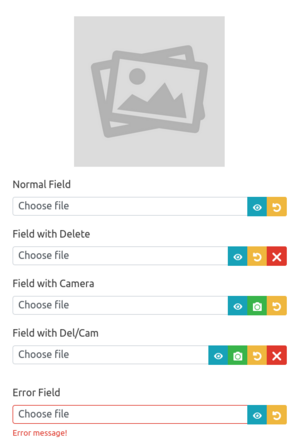
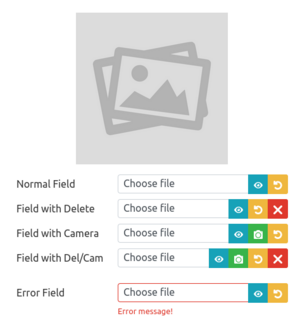
NOTES on file field behaviour, additional buttons, and image box:
- The body of the field itself triggers a file selector.
- The view button
 opens the currently selected file in a new tab.
 - The cam button
 activates the camera modal where the user can capture an image with an applicable peripheral. This button only appears if the form has a BooleanField named
 '<file_field_name>_isshot'drawn (can be hidden) on the page. - The revert button
 undoes the change made to the file field and restore its original file/value.
 - The unselect button
 clears the file field. This button only appears if the form has a BooleanField named
 '<file_field_name>_isdel'drawn (can be hidden) on the page. - The image box triggers the view button. Note that the image box is not drawn automatically via the
render_uploadmacro. Should it be needed, developers must create the<img>element manually and give it the id'<file_field_name>-imgbox'before runninggeneral_form_tail. The tail macro shall automatically detect and link the image box with the form field.
Buttons & Submits
render_submit(form, blank,
              class="primary", confirm_first=false,
              hidden=false, tabindex=false,
              force_fat=false, force_slim=false)

render_btn(id=false, size="normal",
           width=false, height=false,
           label=false, icon_name=false,
           class="primary", custom_color=false,
           hidden=false, tabindex=false,
           slim=false, disabled=false)
| Parameters | (See descriptions under #String & Text Area Fields sub-section)
|
General Form Tail
At this point, the form_obj has been initiated, all fields and relevant elements are created; it is time to finalize the form_obj attributes and link all the form elements together.
general_form_tail(form, populate=true, pack_del=false)
| Parameters |
|
The workings of this macro can be thus summarized:
- Process the form's populate_id attribute
- Interpret and repack each string value into a more easily usable format.
- Where applicable, bind a change event to the referenced fields so that they trigger a form re-populating routine when changes are detected.
- Finalize References to DOM Elements & Objects and Field State & Type Attributes families of
form_objattributes. - Deal with form fields, adjacent buttons, and image boxes
- Assign additional field attributes to facilitate track_tb, search and instacalc routines
- Bind events to take care of ...
- Functionalities of adjacent buttons
- Field formatting for all special types
- Pattern recognition for date/time types
- Form navigation while considering the fields' search, instacalc, field_modal, and field_tab attributes.
- Minor behaviour tweaks via attributes and/or event bindings
- If 'pack_del' is
true, bind the relevant submission event - Bind pre-submission and submission routine
- If 'populate' is
true, send a data fetch request
Notable Features & Sub-routines
This section aims to give a little insight into some CuneiForm's notable sub-routines.
Table Tracking
The role of the table tracking form in this feature is only to pack the appropriate value into the attribute selection_trackers of the corresponding table_obj. The inner working of this function is all handled by CuneiTable, refer to the main article for more details.
Search and Fill
In the search-fill function, a CuneiForm take responsibility in two areas:
- Invoking the corresponding search table or search modal. The control of the client-side behaviours is then relinquished to the table or modal.
- Once the table or modal has retrieved the selection result from the server, the client-side control is handed back to the CuneiForm to do the form filling.
Refer to the main CuneiTable article for a template of a Flask route that handles table populating and search result fetching.
Searching
Searching and filling sub-routine can be triggered in 3 ways listed below, with slightly different behaviours. These 3 trigger paths can be conflicting, thus the populating and search_filling flag attributes.
- Click event on the adjacent search button
 . This trigger mode always launch the search modal with full selections then cedes control.
 - Pressing Tab ↹ or ↵ Enter to navigate away from the search field. This triggers the quick-search mode.
- Navigating away from the field by any other means (handled by change event on the field) also triggers the quick-search mode.
CuneiForm only triggers quick-search mode for single-selection search tables; multi-selection tables are always invoked in normal mode.
In quick-search mode, CuneiForm commands the search table (directly within the search modal) to send a modified data fetch request first, then relinquishes control. The modified CuneiTable fetch request has a special instruction to:
- Fetch only entries whose search column value start with the field value.
- If the fetch returns multiple entries, the search modal is launched by CuneiTable itself.
- If the fetch returns only 1 entries, automatically make the selection and does not show the search modal at all. (The modal might appear if the server takes longer than 500ms to respond, in that case, the modal will automatically close.)
NOTE THAT trigger paths #2 and #3 only work if the field value is modified (detected via input events on the field) to prevent unnecessary requests.
Filling
Form filling after a search result fetch is handled by the JavaScript function process_invoker, which closely mimics the normal form filling routine with some additional flag manipulation.
After filling, user might expect additional navigation behaviour (especially when the search is initiated by trigger paths #2 and #3). This navigational follow-up is handled by the JavaScript function post_fill_invoker.
Although these 2 functions resides in the JavaScript file for CuneiModal, their inner workings are heavily based on CuneiForm logic.
Instacalc Routine
Instacalc is a populating-type operations not too different from search-filling. It is even triggered by the same trigger paths #2 and #3 listed above.
The rough step-by-step working of an instacalc cycle is as follows:
- Determine whether the invoked instacalc should be processed immediately, queued, or dumped.
- Send an instacalc POST request to the server.
- Once a successfull instacalc response is received, fill the form with appropriate values/formatting. Then, run functions in post_insta_cmds attribute of the
form_obj(if any).
Process, Queue, or Dump
A single CuneiForm only handles one instacalc routine at a time. This behaviour necessitate a queue. Each invoked instacalc goes through these filters:
- Check whether an instacalc with the same route is currently running or already in the queue. (Instacalcs re-invoked from the queue get to skip this filter.)
- If yes, the invoked instacalc is dumped.
- Check whether the CuneiForm is currently running another instacalc (via flag populating).
- If yes, the invoked instacalc is queued.
- For an instacalc re-invoked from the queue, check whether all the result fields are already handled by the most recent populate-type process.
- If yes, the invoked instacalc is dumped.
- Once this point is reached, the invoked instacalc is processed.
Instacalc Route Template
Although instacalc is a form-based procedure, a very similar and related procedure is also presented in CuneiTable, specifically when a column in the table is not presented in the database but is calculated on the fly before being sent over to the client-side. Thus, it is advised that an instacalc route be written with such 'internal calls' in mind.
Below is the model of a typical instacalc route:
@<blueprint>.route('<instacalc_path>', methods=['POST'])
@login_required # Optional
def <function_name>(internal_args=None):
    # 'internal_args' is given as a dict when internally called.
    if internal_args is None:
        identifiers = json.loads(request.form.get('identifier'))
        <input0> = identifiers['<input0_key>']
        <input1> = identifiers['<input1_key>']
        ...
    else:
        <input0> = internal_args.get('<input0_key>')
        <input1> = internal_args.get('<input1_key>')
        ...
    # Calculation block
    ...
    ...
    return {'<output0_key>':<output0>, '<output1_key>':<output1>, ...}
Being able to move around the form with a mouse provides easy access and peace of mind to new users. However, one cannot deny the efficiency of an intuitive form navigation via a keyboard. To accommodate such functionality, a custom navigation and focusing routine has to be developed for CuneiForm.
Keyboard form navigation in CuneiForm uses:
- Tab ↹ or ↵ Enter to go forward in the form and
- ⇧ Shift+Tab ↹ or ⇧ Shift+↵ Enter to go backward
Determining What's Next
CuneiForm follows the steps listed below to determine which element shoud take the focus next:
- Look at the next (or previous) logical field:
- If the current field has a custom next/previous field defined (via attibutes
custom_next_eleorcustom_prev_ele), look there. - Otherwise, look for the next field in the form's
seqarray.
- If the current field has a custom next/previous field defined (via attibutes
- Check whether that field should take the focus.
- The field must NOT be skipped (not present in the form's
skipseqsattribute). - The field must NOT be in disabled or read-only state.
- The field and its parent element (the corresponding elements in
fill_elesandfill_ele_divs) must NOT be hidden (element.style.display !== 'none'). - If the navigation is invoked by ↵ Enter, the element must NOT be a button.
- The field must NOT be skipped (not present in the form's
- Proceed if the field in consideration passes all test in Step #2. Otherwise, go back to Step #1.
- Check if the field has a proxy element defined:
- If yes, define the next focus element as the proxy.
- Otherwise, define the next focus element as the field in consideration itself.
- Move focus onto the next focus element. (If the element does not share the same modal or tab with the current field, delay this step to allow the modal or tab to open/close.)
Setting Up a Field Proxy
There is quite a few (but repeated) steps in setting up a proxy element for a field. Hence, CuneiForm comes with a ready-to-use link_proxy function.
link_proxy(form_name, fname, proxy_ele, proxy_func)
| Parameters |
|
This function takes care of the proxy linking and relaying some key events on it back to the real form field.
